Week 3: Optimization
Hi everyone!
This week, we tested our first build on the Quest 2 standalone. We were a little bit worried about this step, because you are very likely to underestimate the power of the Quest 2. It is an Android based VR-Headset that comes with 6GB DDR4x RAM powered by a Snapdragon XR2 SoC. It's a SoC manufactured by TMSC that is especially designed for XR-Hardware. "Especially" isn't 100% true because it is a derivate of the Qualcomm Snapdragon 865 that is used in a lot of high-end smartphones from 2019, like for example the Samsung Galaxy S20. It's based on an ARM 7nm CPU with 8 Threads and a clock speed of around 2420 - 2840 MHz. Overall it doesn't sound that bad, but you still need to consider, that it is a mobile device and not a gaming PC connected to a power outlet. Also, due to the VR-Setup we need to calculate every image once per eye, which simply doubles the required calculations for rendering. Besides, there is all the room + controller tracking that requires also a lot of power. Overall, you could say that very nice graphics are not capable at this moment, but we would be thrilled if maybe someday Apple announces their own VR-Headsets with one of their SoCs ;)
To provide a nice immersive feeling, we need at least 72 FPS, anything less doesn't feel smooth in VR and creates motion sickness. The display of the Quest 2 provides 120Hz, but anyway 72 FPS are already hard enough to achieve.
So this means that we need to focus on the performance right from the beginning of the project. So this week we researched around techniques in order to achieve stable 72 Frames per second that we want to share with you :)
Post Processing: With Post-Processing you can simply add effects to the image after the rendering process. These effects could be, for example, some bloom effect, ambient occlusion, color grading or Software Antialising techniques like FXAA or SMAA. Post-processing is a nice feature to achieve stunning visuals, but since we are using VR and have two images (one per eye) this means that we need to post process twice. So right now there is simply no chance to combine Post Processing and VR. Even the simplest scene will result in 30 FPS, even with just some very light post-processing going on. So if we want to recreate the effects from post-processing, we need to use some different techniques.
Recreate Color-Grading: We can use the color grading from the Post Processing Stack in order to achieve a nice sample image. With post-processing disabled again, we then simply try to recreate the visuals through playing with the lightning and the material settings.
Antialising (FXAA, SMAA): Luckily, Hardware Antialising exists, so we can use MSAA to smoothen our edges. MSAA 4x seems to be the sweet spot in consideration of performance and quality.
Lighting: Realtime Shadows and lighting is great to have, but it is very expensive. Therefore, we can bake all the information into a lightmap which is some sort of texture that is painted over the scene in order to recreate all the shadow and AO information.
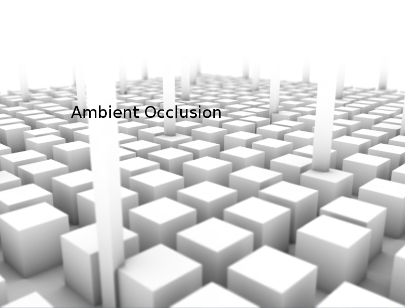
Ambient Occulusion (AO): AO is nice to give objects some more depth, as you can see in the picture below. AO doesn't need to be calculated in real-time and can therefore also be baked into the lightmap.
Heightmaps: With heightmaps you can add extra depth information to your textures. Unfortunately, heightmaps aren't VR-friendly yet, and we need to live without it.
Light Probes: Real-time lightning is nice, but a very expensive feature. Through light propes you can create some sort of baked lightning for dynamic objects. These light probes represent some sort of areas that stores baked lightning information, so that we can have simplified lightning on moving objects, without much of a performance decrease.
Occulusion Culling: Through occlusion culling, we can simply tell Unity to not render objects that are not visible to the camera, because they are for e.g. hidden behind a wall.
Reduce Polygon count: Officially Meta says that the Quest 2 can handle 600.000 tris up to one million triangles per scene. Our experience says that you should aim for less than 600.000. Which can be achieved through optimizing your models.
Reduce Draw Calls (Batches): The official Quest 2 Performance targets, suggest to aim for 80-200 draw calls. A draw call represents an API call to the graphic card in order to render an object. Draw calls are thereby related to the amount of meshes times materials. So for an object, with two materials that appears twice in the scene, we need to make four draw calls. Solutions to reduce the draw calls are static batching, which simply combines static (not moving) objects into one big object, that needs one draw call. Another optimization is GPU instancing that is handy for objects that appear multiple times, like for e.g. trees. All these objects will be instanced by one single draw call.
Used Optimized Shaders: It is not surprising that some shaders, such as transparent shaders, require more processing power and should rather not be used or only to a limited extent.
Object Pooling: This technique is useful if you for e.g. create a gun that shoots thousands of bullets. All these bullet objects belong to the same model, so instead of creating and destroying the bullets after some time, we can simply keep the destroyed bullets in a pool and if we need new bullets, we use the bullets from the pool. This approach is more performant, because it reduces the CPU cycles usage for new allocations and garbage collection.
Render Pipeline: Unity offers three different Render Pipelines: HDRP for High Definiton, URP (Universal) and the built-in pipeline. URP is especially designed for mobile, so this is the way to go.
With all this stuff in mind, we hope to be able to provide users with a smooth experience in our final built. For now, we achieve 72 FPS!
Hopefully you also find this topic as interesting as we did!
We would be very happy if you could share even some more performance tricks with us!
Cheers,
Your Fall into Blue team
| Sebastian | + 7 h | 31 h |
| Ronja | + 3 h | 23 h |
Leave a comment
Log in with itch.io to leave a comment.